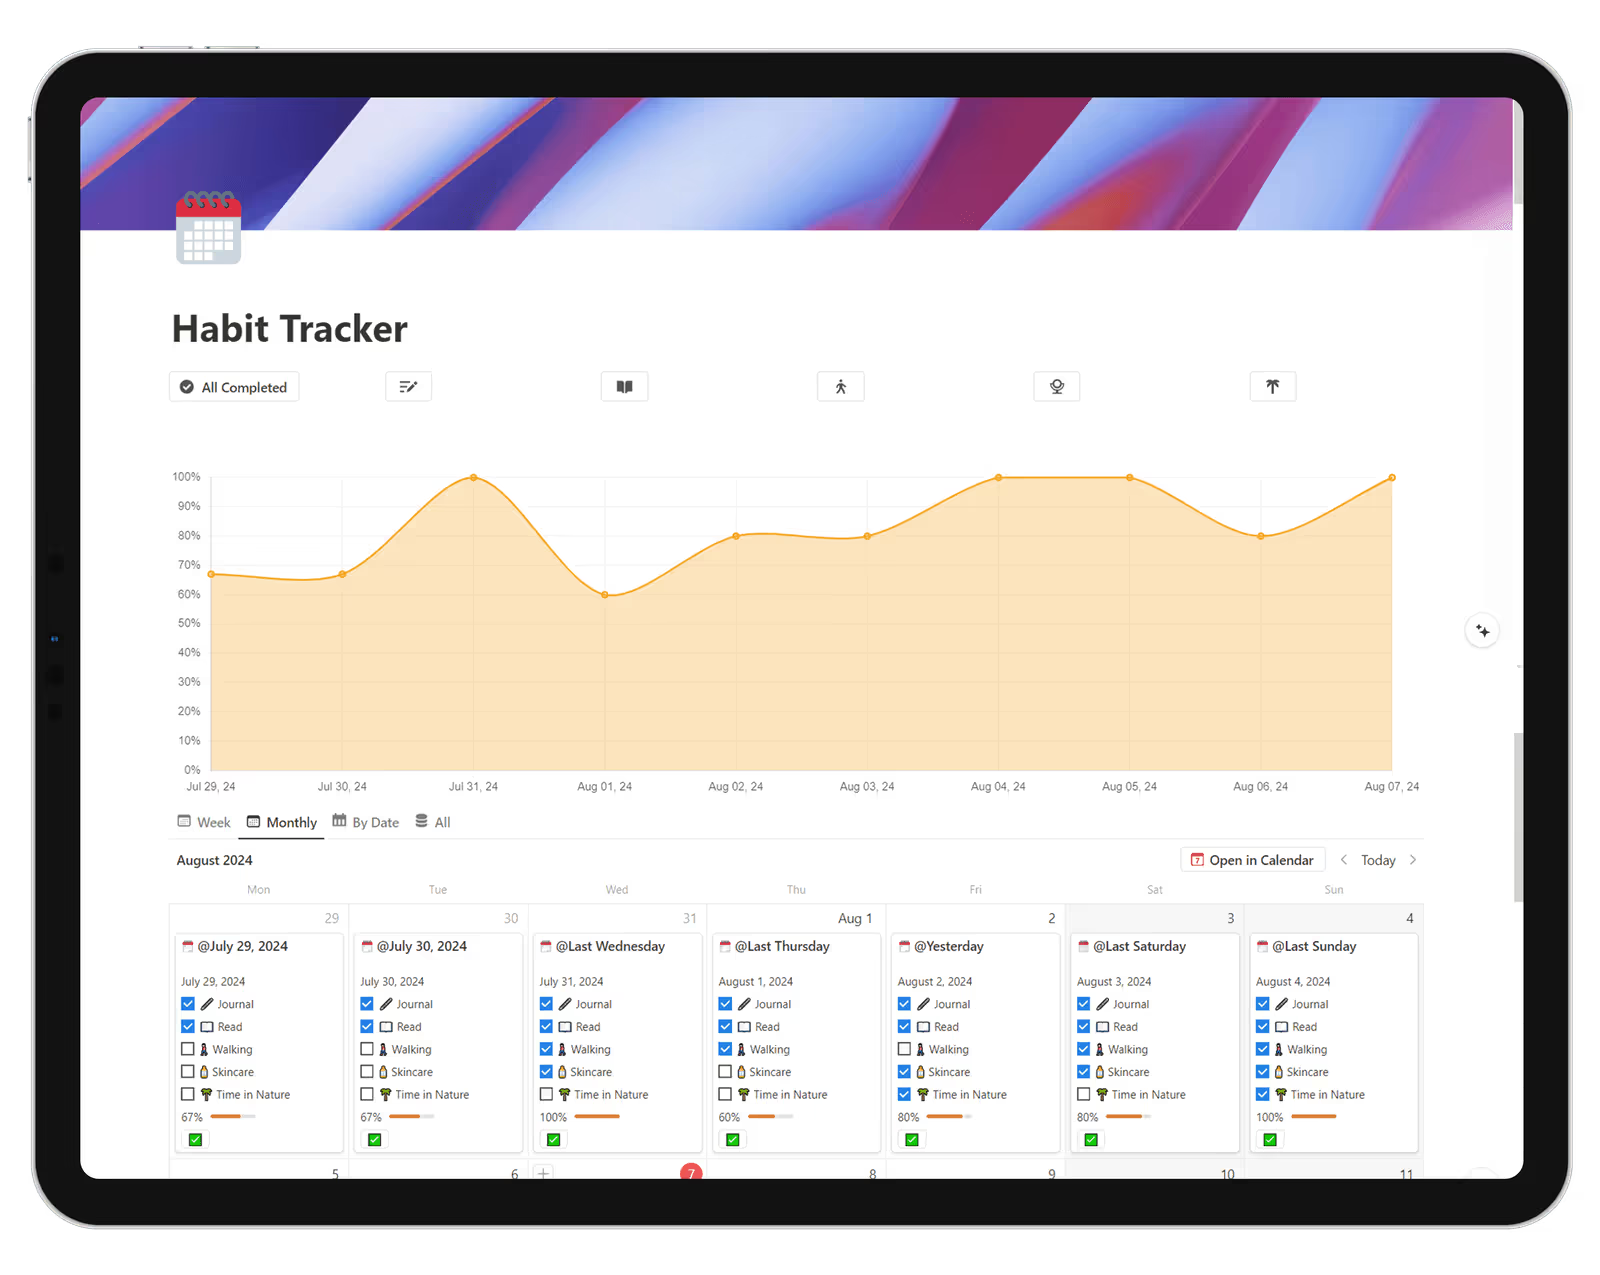
In this tutorial, we'll show you how to build an aesthetic habit tracker in Notion that includes progress bars and graphs. Follow this tutorial to set up a tracker that helps you monitor your habits. You can find the same tutorial on YouTube if you prefer to follow along with a video. Let’s start!
.avif)
Overview
There are many ways to build a habit tracker in Notion. In this tutorial, I’ll show you the golden standard right now. We’re going to create a daily habit tracker with a database, progress bar formula, graphs and charts, and calendar view. To make it even more powerful, we’ll add buttons and set a recurring template to create an automated template. We also cover some nice ways to make it aesthetic with dynamic covers, icons, and the smart use of emojis.
Setting Up the Database
-min.avif)
- Create a new page and call it Habit Tracker.
- In the page settings, turn Full Width on so we have more space to work with.
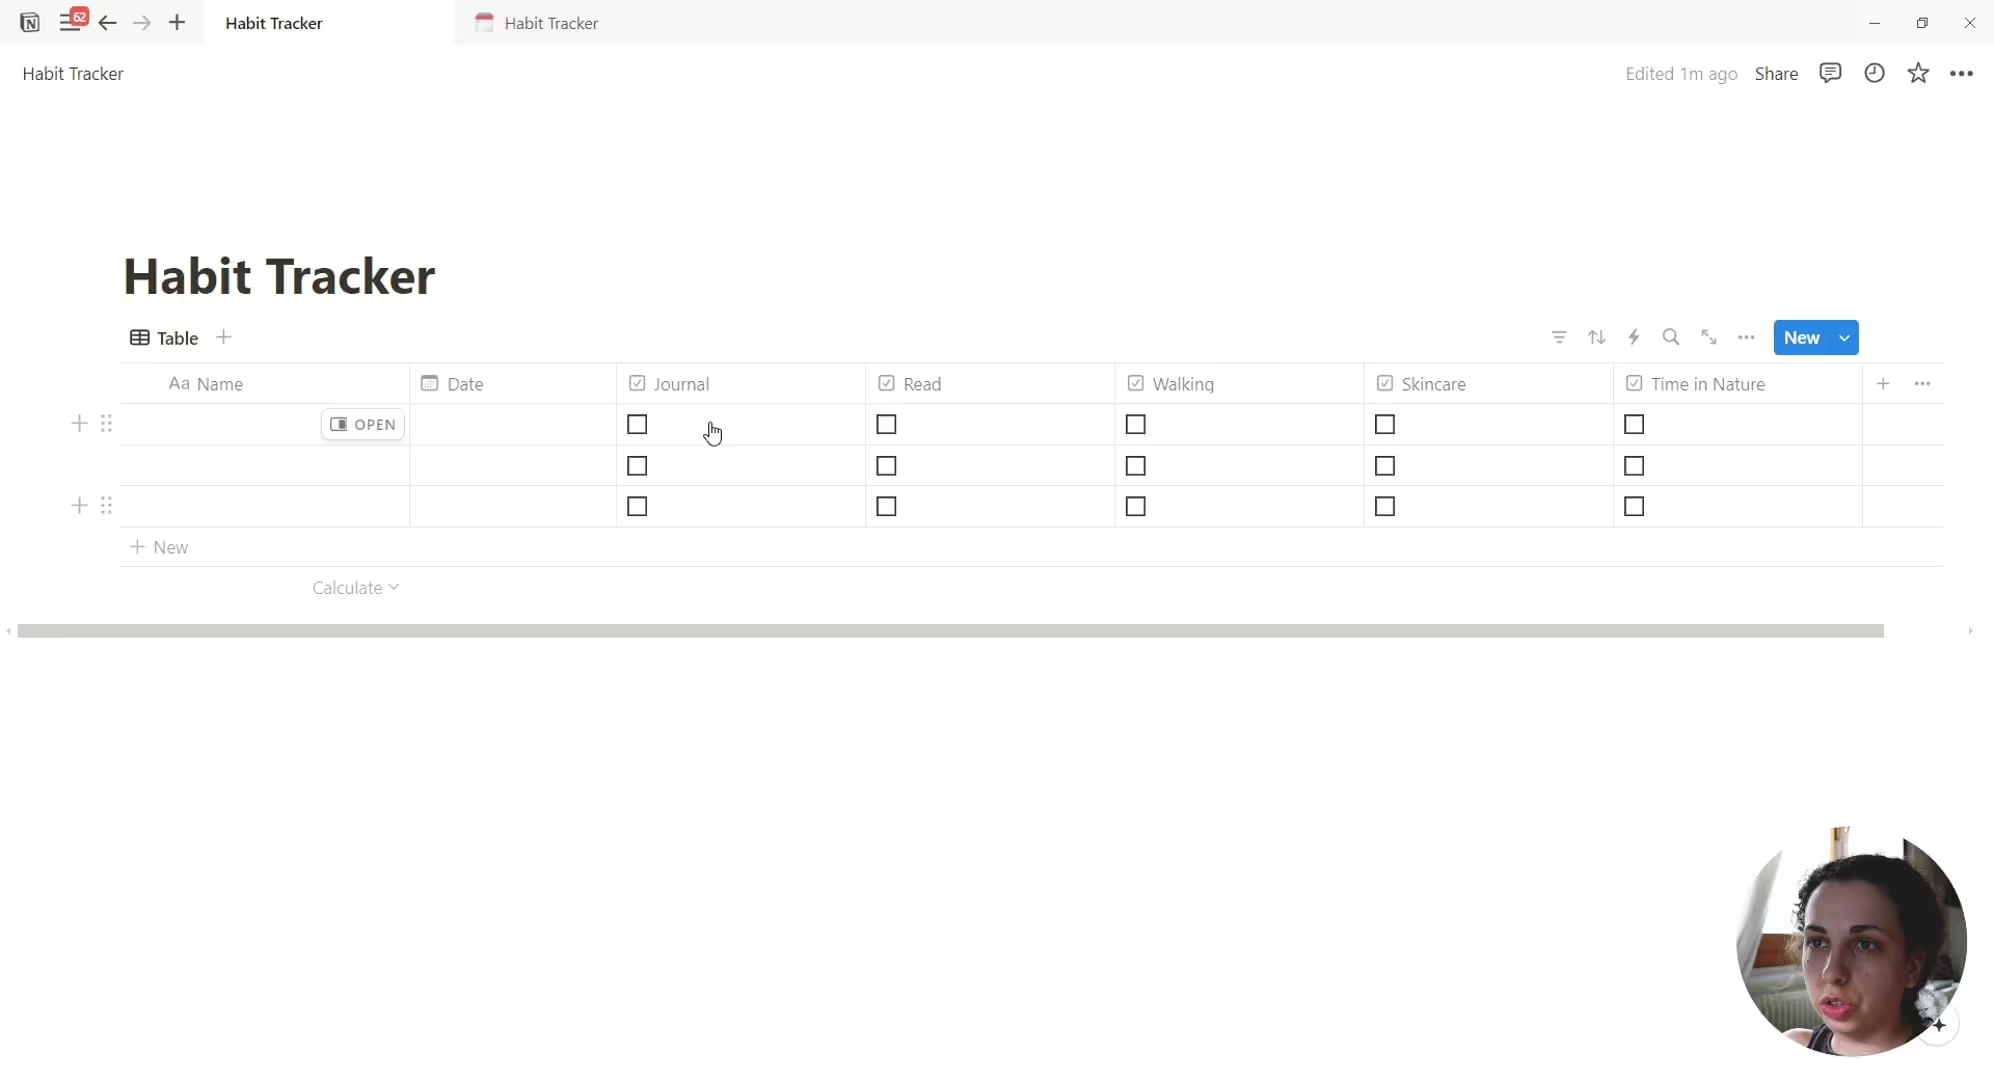
- Type “/database” and add an Inline Database. Rename the database title to Habit Tracker.
- Remove the Tags property; we don’t need it.
Adding Properties

- Let’s add a Date property and leave it for now. We’re going to set a template so the date is automatically added.
- Now, for each habit we want to track, add a Checkbox property. In this example, I’ve added 6 habits.
- Double-click on the end of each checkbox column to resize the column to fit the checkbox.
- Replace the default checkbox icon with a relevant icon for each habit so it’s easy to find the right habit when you need it.
-min.avif)
- Now let’s create a new Number property and call it “Total Habits.” You don’t need to change the icon, as this property will be used in the backend and can be hidden from the habit tracker. This property allows us to have more control over how many habits we want to track and allows us to increase the number of habits we track seamlessly. For example, I start by tracking 3 habits for the first month, then add another habit, and so on. This property needs to be set up in the template once and only needs to be updated when you want to increase the number of habits to track.
-min.avif)
Progress Bar Formula
- Now, let’s create a Formula property, call it “Progress,” and change the default icon.
- In the property settings, change the number format from the default to Percent. To create the progress bar, in the formula settings, select Show As > Bar or Ring if you prefer. You can also change the color of the progress bar and hide the number if you prefer.
-min.avif)
- Add this formula
round(
(prop("📖 Read").toNumber() + prop("🖊️ Journal").toNumber() + prop("🚶🏻♂️ Walking").toNumber() + prop("🧴 Skincare").toNumber() + prop("🌴 Time in Nature").toNumber()
)/prop("Total Habits")*100)/100
Here’s how the formula works:
We ask Notion to turn each checkbox property (that returns FALSE or TRUE) into a number. If the property is checked, the checkbox is TRUE. With the code toNumber("Property"), that is converted into a number. TRUE will be 1, and FALSE will be 0. We connect all our habits with the “+” symbol. That will result in a number from 0 (no habits checked) to 6 (all habits checked). We then divide the sum by the total habits (in this case, 6) to get a percentage.
You can copy and paste this formula, replace it with the name of your habits, and customize it to fit the actual habits you want to track.
Notion will accept both the 1.0 Formula Syntax and the 2.0 Formula. For example, writing toNumber("Property") is the same as writing ("Prop").toNumber().
The round formula rounds the result to be a full number to avoid having percentages look like 16.333333%. This can be achieved by adding the round formula, multiplying by 100, and dividing by 100. If you want to have one digit, you can multiply by 1000 and divide by 1000.
-min.avif)
Automate the Template
Let’s create the habits template.
- Click the little down arrow in the blue “New Button” in the database. Create a new template.
- You can add a dynamic date in the title by typing “@” to summon the date selector. Choose Today > Date when duplicate.
-min.avif)
- Add an icon or emoji to the template page.
- In the Date, select the dynamic option Today > Date When Duplicate.
- Add the total habits you want to track (You can change it at any time later).
- You can save the template.
- Be sure that the template is set to default.
- Automate the creation of the daily page by clicking Repeat > Daily. You should see a blue icon next to the template.
-min.avif)
Adding Buttons
-min.avif)
Adding buttons is an incredible way to make a Notion Habit Tracker feel like an app. By using buttons, you can press a button to automatically check off your habits. Here’s how to do that:
We’re going to add two types of buttons: an inline button inside the habit tracker database itself and a standalone button that we can access from any Notion page.
- Inside the habit tracker database, create a new Button Property.
- Change the button name. I like to use an emoji like this ✅ in place of a name.
- Just add all habits properties in the “Do This” section and set them as checked. Then save. When you press the button, all habits for that page will be checked.
- For the other button, on the page above the database, type “/button” to add a button.
- You can change the button name and also add an icon or emoji.
- In the “Do This” section, click Add Section and Choose Edit Pages in.
- We need to choose our habit tracker database from the list. Be sure to select the correct one.
- After selecting the database, hover over “All Pages” to select what page we want to edit. This allows us to choose a filter to select the page. Click Date > Start Date > Is > Today to have just the current day's habits affected by the button.
- Next, you can add another step, and as you’ve done with the inline button, just add all your habits and set them as Checked.
- Click Done.
- Duplicate this button for each habit you have. Next, change the name and icon so it’s easy to recognize which habit the button will affect. Leave only one habit and repeat the process for each habit.
- Just drag and drop each button so they display as a line, like a menu. Buttons work as any block in Notion. If you are not familiar with how to create columns in Notion, check this article.
Adding Calendar View
-min.avif)
Now, the habit tracker is completely set up and working. Let’s make some adjustments to make it look better. Let’s create a new view.
- Create a new view and change the layout from Table to Calendar, and reveal all the properties (except for Total Habits). Arrange the properties so the order is right. For the weekly calendar, be sure to change the view layout of the Calendar to Week.
Make the Habit Tracker Aesthetic
-min.avif)
If you are not interested in making it aesthetic, just skip to the Adding Graph section. I personally like to have one more view in my habit tracker. After the weekly calendar view and a monthly calendar view, I’ll add a gallery view. The gallery view will give us the most control over the look and aesthetic of the template.
- Create a new view and change the layout to Gallery.
- In the settings, choose Group > Group by Date > Date By > Week, so you have all your habits grouped by week.
- Zoom in or out to have all seven days fit in one line for better results.
Dynamic Cover
-min.avif)
To add a cover to your daily pages, you can just add the cover inside the page. This method is more straightforward but has limits. For example, if we want to change the cover, we will need to open pages one by one and replace the cover. Here’s a better method.
- Create a File & Media Property.
- Add the Habit Template and upload an image for the cover or add a cover with a link. Remember that you can also use GIFs. Check Notion Aesthetic 101 to learn more about covers in Notion.
- If you want to easily switch between different covers, add multiple images inside File & Media. The first one will be the default; rearrange the order by dragging and dropping.
- When you create a new page, this will add the correct image. If you already have properties inside your habits tracker, just add the image there and from the table view, select the File & Media column, and drag to fill all your pages with the images.
- Now, in the Gallery Layout, select Card Preview and pick the Files & Media property.
Adding Graph
-min.avif)
Notion is about to release Graph and Chart as a native feature. Meanwhile, we will use an external tool called Notion2Chart to add our Graph. With a free account, you can just have 1 free chart.
- Go to ChartBase (formerly known as Notion2Chart).
- Subscribe and create a free account. You can easily sign up with Google. When you create the account, you’ll get to a page to allow access to your Notion pages. Be sure to select the right workspace and select the correct database, and give access.
- Now let’s create a new chart.
- Choose Line Chart.
- Pick the database of your habit tracker (Note that this asks for the database name, not the page in which the database is located.)
- For the X-axis, choose the Date.
- For the Y-axis, choose Progress.
- Change the color of the graph. Other features will be locked on the free account.
- Click “Embed Link” and copy the link.
- Come back to Notion. Paste the link and choose Embed.
- Refresh to update your data.
- Use the icon for switching the chart to Dark Mode.
- You’re done!
-min.avif)
Aesthetic Habit Tracker Video Tutorial
Link of the video here
Free Aesthetic Habit Tracker Template Download
Don’t want to build the template by yourself? You can download this Aesthetic Habit Tracker Template for free here.


